Recent trends in software development have shown that APIs are the best option for enabling cross-communication between apps, end-users, and other apps. Tons of data can be wrapped around an API and extended via a single endpoint. Often interfaces are needed to interact with an API and these interfaces have to be user-friendly. However, situations may arise where a user-friendly interface cannot be put together or isn’t needed as stated by existing use cases.
Thus it’s important to know how to communicate with APIs in other ways — one of which is the command-line interface. In this tutorial, you will use Reloadly’s airtime API and the ASP .NET framework to learn how to deploy REST APIs through a command-line interface.
Prerequisites for this tutorial
- Intermediate knowledge of C#. You can get started here
- .NET SDK 5.0 or later — this can be found with installation instructions here
- An open-source, cross-platform code editor such as VS Code
- Newtonsoft — a high performant JSON framework for .NET applications
Getting Started with .NET
The first step to working with the .NET framework is to create a new application. Navigate to the command line of your code editor and use the dotnet new console command to create a new application:
dotnet new console --name WebAPIClientOnce this is done, navigate to the newly created WebAPIClient application directory and install Newtonsoft. Once this is done, run the application:
cd WebAPIClient

dotnet add package Newtonsoft.Json --version 13.0.1

dotnet run
At this point, all there is to your application is a function that prints the phrase “Hello World”. The next section will show how you can improve things by adding more functionality to your app.
Getting started with Reloadly’s Airtime API
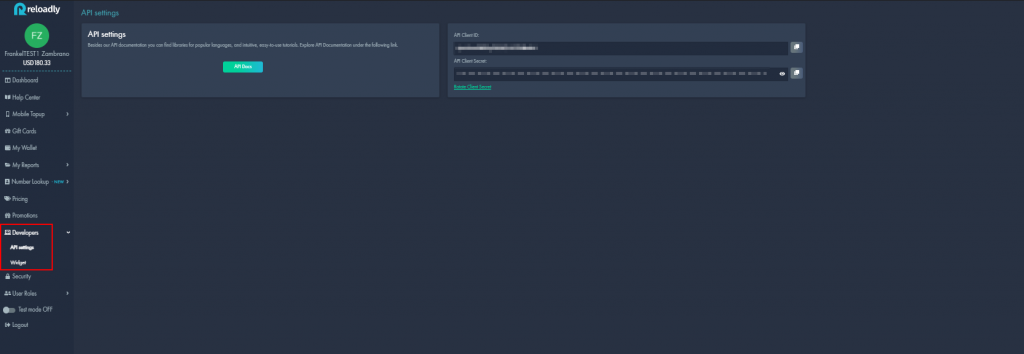
To make an airtime recharge through Reloadly’s API, you’ll need an access token. You can get this by signing up for an account on Reloadly and using your client credentials to make a POST request for an access token. On your Reloadly dashboard, you can view your client credentials in the Developers section as shown below:
To make an airtime recharge through Reloadly’s API, you’ll need an access token. You can get this by signing up for an account on Reloadly and using your client credentials to make a POST request for an access token. On your Reloadly dashboard, you can view your client credentials in the Developers section as shown below:

Next, use these credentials to make a POST request to the https://auth.reloadly.com/oauth/token URL with the following properties:
{
  "client_id":"YOUR_CLIENT_ID",
  "client_secret":"YOUR_CLIENT_SECRET",
  "grant_type":"client_credentials",
  "audience":"https://topups.reloadly.com"
}
You can do this via Postman or any other tool. Personally, I would recommend ReqBin, an online testing tool for REST APIs.
A successful response containing your access token would be similar to the code snippet below:
{
    "access_token": "eyJraWQiOiIwMDA1YzFmMC0xMjQ3LTRmNmUtYjU2ZC1jM2ZkZDVmMzhhOTIiLCJ0e      XAiOiJKV1QiLCJhbGciOiJIUzI1NiJ9.eyJzdWIiOiI2ODkzIiwiaXNzIjoiaHR0cHM6Ly9yZWxvYWRse      S5hdXRoMC5jb20vIiwiaHR0cHM6Ly9yZWxvYWRseS5jb20vc2FuZGJveCI6ZmFsc2UsImh0dHBzOi8vcm      Vsb2FkbHkuY29tL3ByZXBhaWRVc2VySWQiOiI2ODkzIiwiZ3R5IjoiY2xpZW50LWNyZWRlbnRpYWxzIiw      iYXVkIjoiaHR0cHM6Ly90b3B1cHMtaHMyNTYucmVsb2FkbHkuY29tIiwibmJmIjoxNjI3OTk4NDQzLCJh      enAiOiI2ODkzIiwic2NvcGUiOiJzZW5kLXRvcHVwcyByZWFkLW9wZXJhdG9ycyByZWFkLXByb21vdGlvb      nMgcmVhZC10b3B1cHMtaGlzdG9yeSByZWFkLXByZXBhaWQtYmFsYW5jZSByZWFkLXByZXBhaWQtY29tbW      lzc2lvbnMiLCJleHAiOjE2MzMxODI0NDMsImh0dHBzOi8vcmVsb2FkbHkuY29tL2p0aSI6Ijg1YjMwYmF      iLTIzYjUtNDUxMy04NDUwLWMxMzQ1ZDA0NmE0ZiIsImlhdCI6MTYyNzk5ODQ0MywianRpIjoiYThhOTIy      MjAtYzRlNS00M2MyLWE4NTctNjRkMjhlNzU5OWRhIn0.cAAGo4h0R3lPetkRpKATkwdHdS1bM791-vxgccEa9T4",
    "scope": "send-topups read-operators read-promotions read-topups-history read-prepaid-balance read-prepaid-commissions",
    "expires_in": 5184000,
    "token_type": "Bearer"
}
Working with .NET classes and methods
Your application when complete should be able to do the following:
- Receive details such as a mobile phone number, operator ID, and recharge amount as input
- Make an HTTP POST request to Reloadly’s API with the received details and share a response in the command line
To begin, you’ll instantiate .NET’s Main method. The Main method serves as an entry point for every .NET application. You will also create an asynchronous method that will define the API request you’re going to make. Navigate to the Program class in your application’s folder and create the asynchronous method alongside the Main method:
/// Program.cs

namespace WebAPIClient {
  class Program {
    static async Task Main(string[] args) {
      await ApiCall();
    }

    private static async Task ApiCall() {

    }
  }
}
Next, create an instance of an object that contains details of the airtime recharge you are going to make. This can be done via Newtonsoft’s JsonConvert class which provides a method for converting between .NET types and JSON types:
/// Program.cs

namespace WebAPIClient {
  class Program {
    static async Task Main(string[] args) {
      await ApiCall();
    }

    private static async Task ApiCall() {
    //...

       var json = JsonConvert.SerializeObject(new {
              operatorId = "341",
              amount = "20",
              customIdentifier = "airtime-recharge",
              recipientPhone = new {
                countryCode = "NG",
                number = "08147628727"
              }
          });
    //...

    }
  }
}
In the code snippet above, the details for the airtime recharge to be made using Reloadly’s Airtime API were defined in a JSON object. Here’s a brief summary of what each property represents:
| Property | Description |
amount | This indicates the amount to be recharged |
operatorId | This indicates the mobile number’s operator ID |
countryCode | This is the country code of the mobile number to be recharged |
number | This is the mobile number that is to be recharged |
customIdentifier | This is a unique transaction reference that is to be assigned to a recharge |
recipientPhone | This represents an object that contains the details of the mobile number to be recharged |
After this, include the endpoint that will be used to make the HTTP POST request in your application. You can do this by using the HttpRequestMessage class which represents an HTTP request message in .NET applications. The request can be instantiated as shown in the code snippet below:
/// Program.cs

namespace WebAPIClient {
  class Program {
    static async Task Main(string[] args) {
      await ApiCall();
    }

    private static async Task ApiCall() {
    //...

       var json = JsonConvert.SerializeObject(new {
              operatorId = "341",
              amount = "20",
              customIdentifier = "airtime-recharge",
              recipientPhone = new {
                countryCode = "NG",
                number = "08147628727"
              }
          });
       var message = new HttpRequestMessage(HttpMethod.Post, "https://topups.reloadly.com/topups"){
            Content = new StringContent(json, Encoding.UTF8, "application/json")
          };
    //...
    }
  }
}
In the code snippet above, an HTTP POST request was instantiated using the https://topups.reloadly.com/topups endpoint. The content type to be expected as a response was also specified using the StringContent class.
Once this is done, the next step is to authorize the HTTP request. This is done by including the access token gotten when you signed up for an account on Reloadly. The access token can be included in the HTTP request header as shown in the code snippet below:
/// Program.cs

namespace WebAPIClient {
  class Program {
    static async Task Main(string[] args) {
      await ApiCall();
    }

    private static async Task ApiCall() {
    //...

       var json = JsonConvert.SerializeObject(new {
              operatorId = "341",
              amount = "20",
              customIdentifier = "airtime-recharge",
              recipientPhone = new {
                countryCode = "NG",
                number = "08147628727"
              }
          });
      var message = new HttpRequestMessage(HttpMethod.Post, "https://topups.reloadly.com/topups"){
            Content = new StringContent(json, Encoding.UTF8, "application/json")
          };
     message.Headers.TryAddWithoutValidation("Authorization", "Bearer ACCESS_TOKEN");
     message.Headers.TryAddWithoutValidation("Accept", "application/com.reloadly.topups-v1+json");
    //...
    }
  }
}
In the code snippet above, the TryAddWithoutValidation method is used to add the following values to the request’s header:
- The
Authorizationheader which includes the access token - The
Acceptheader which specifies the response types that are acceptable from Reloadly’s servers.
Now you’re done configuring your request, the next thing to do is refine the data format of the response you’ll get from Reloadly. To achieve this, you will use a combination of .NET and Newtonsoft methods:
HttpClient(): For making HTTP requestsSendAsync(): For sending HTTP requests as an asynchronous operationReadAsStringAsync(): Serializing HTTP content to a string as an asynchronous operationJsonConvert: Newtonsoft method that converts your API response to JSONDeserializeObject: Newtonsoft method that deserializes JSON to an objectConsole.WriteLine(): For writing the response to the standard output stream
The code snippet below shows how you can combine these methods to retrieve, parse and display the response gotten from Reloadly’s servers:
/// Program.cs

namespace WebAPIClient {
  class Program {
    static async Task Main(string[] args) {
      await ApiCall();
    }

    private static async Task ApiCall() {
    //...

       var json = JsonConvert.SerializeObject(new {
              operatorId = "341",
              amount = "20",
              customIdentifier = "airtime-recharge",
              recipientPhone = new {
                countryCode = "NG",
                number = "08147628727"
              }
          });
      var message = new HttpRequestMessage(HttpMethod.Post, "https://topups.reloadly.com/topups"){
            Content = new StringContent(json, Encoding.UTF8, "application/json")
          };
      message.Headers.TryAddWithoutValidation("Authorization", "Bearer ACCESS_TOKEN");
      message.Headers.TryAddWithoutValidation("Accept", "application/com.reloadly.topups-v1+json");

      using
          var httpClient = new HttpClient();
          var response = await httpClient.SendAsync(message);
          var responseBody = await response.Content.ReadAsStringAsync();
          var result = JsonConvert.DeserializeObject < dynamic > (responseBody);
          Console.WriteLine(result);
    }
  }
}
Your application should be complete now. Navigate to your command line and run the application with the dotnet run command. Your result should be similar to what’s in the video clip below:
Summary
In this tutorial, you learned how useful the .NET framework is in providing options when working with REST APIs. You also learned how to add and work with inbuilt .NET methods and dependency methods as well. Should you need to take a look at the full codebase of the application used in this tutorial, you can find it on GitHub.


